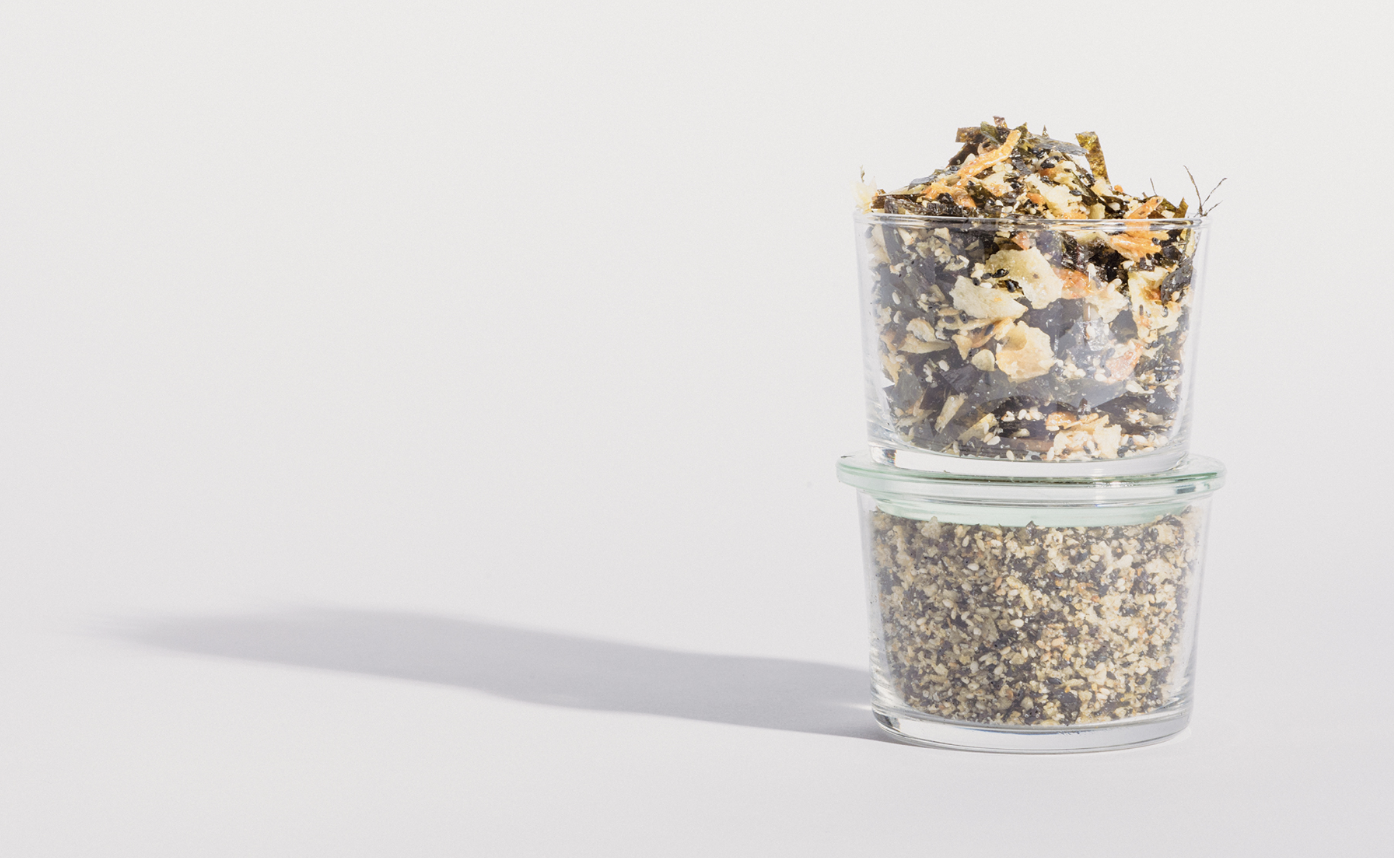
Quirky Furki
This flavor hero might be a bit outside the lines of what you expect from me.
HERE’S WHAT’S IMPORTANT
I like to use white sesame seeds because it’s easier to see how they’re coming along when you’re toasting them (and most specifically whether or not they have burned), but if black sesame is all you have, that’s fine too.
Turbinado sugar is important here not because of a flavor distinction among sugars, but because of its particle size. It’s more granular and less moist than other sugars, so it doesn’t sink to the bottom of the mix or soften things up.
If you’re using shrimp rather than bonito, save the oil you fry the shrimp in and use it to sauté vegetables or scramble eggs or pan-fry fish. It’s full of flavor and will add depth to simple recipes. I do recommend you store it in the fridge. Like all flavored oils, it has the potential to go rancid if exposed to lots of sunlight or warm temps.
Quirky Furki will keep in an airtight container at room temperature for 1 month.
INGREDIENTS
1 cup vegetable oil (not needed if you use bonito flakes)
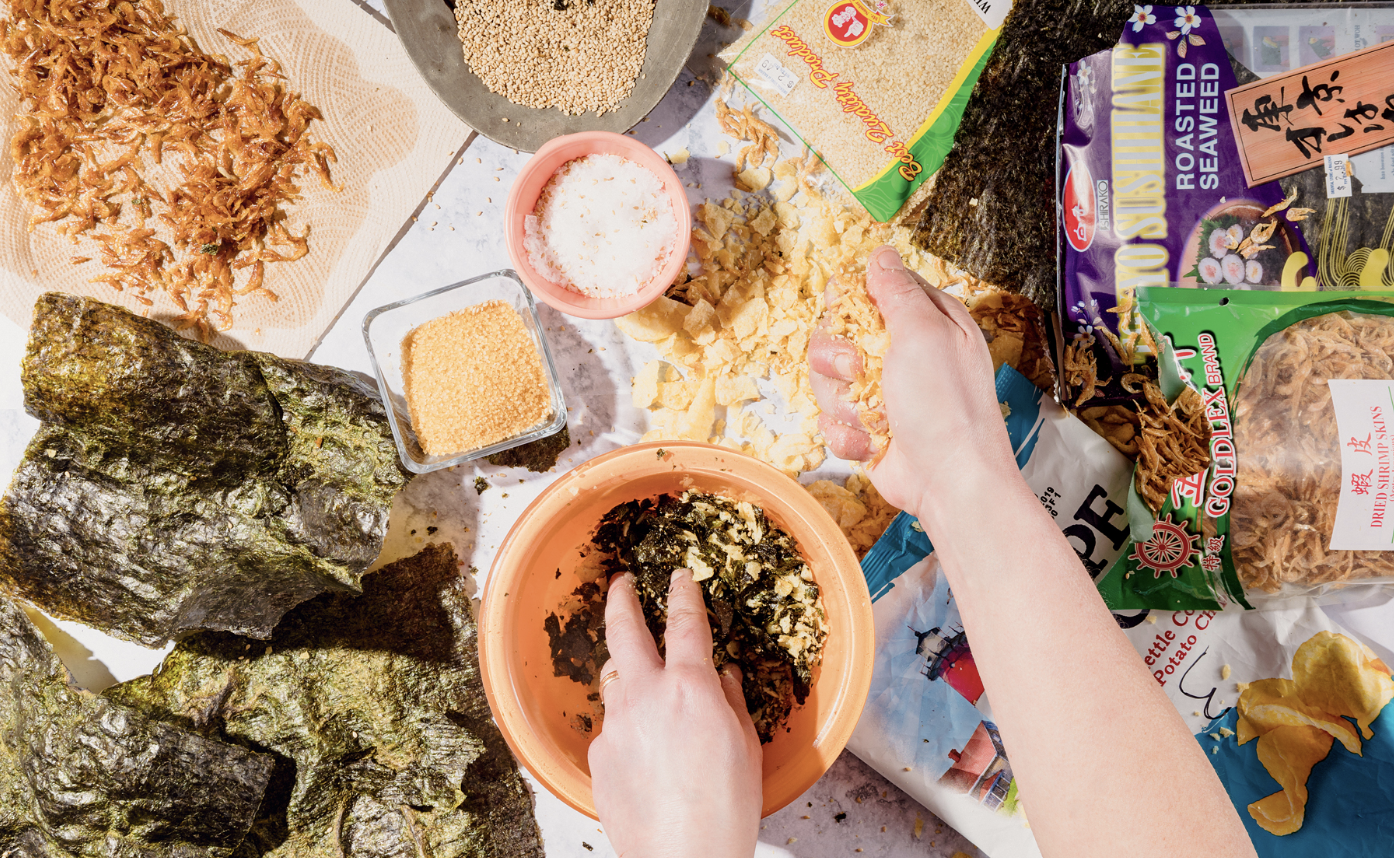
2 cups dried tiny shrimp, or 2 cups bonito flakes
10 sheets (one .88-ounce package) dried seaweed or nori
2 teaspoons toasted sesame oil
1 cup white sesame seeds
5 ounces (about two-thirds of an 8-ounce bag) salt-and-vinegar potato chips (I like Cape Cod brand)
3 tablespoons flaky salt
3 tablespoons turbinado sugar
PREPARATIONS
1. Fry the Tiny Shrimp: If you are using bonito flakes instead of dried shrimp, skip down to toasting the nori. Heat the vegetable oil in a Dutch oven over medium heat while you set up a plate lined with a few layers of paper towels nearby. Drop one shrimp in to see if the oil is ready. If it sizzles immediately, go ahead and drop half the shrimp in the oil. Fry for about 30 seconds, or until the shrimp darken slightly in color. (You’re looking for a toasted crustacean color, not a dark, burnt earth color.) Using a slotted metal spoon, scoop the shrimp out of the oil and put them on the paper towels to drain.
2. You may not enjoy the way the shrimp smell at this point, and you may not appreciate the shrimp’s flavor on its own. Don’t let this deter you and don’t make the executive decision to just leave the shrimp out of the mix. I don’t salivate at their smell or individual taste either, but I love the sum of all these parts enough to dedicate a chapter to it, so trust me and move forward.
3. Fry the remaining shrimp. Drain them on paper towels and remove the oil from the heat. When it’s cool, treat the oil like you would garlic oil, and store it in a jar in the refrigerator.
4. Toast the Nori: If you have gas burners, using tongs, hold one sheet of nori horizontally about 2 inches above the open flame of your stove to toast. Each side will require about 3 seconds, during which the nori sheet will shrink slightly, lighten in color, and may even catch fire. All of these transformations are okay, but blow out the flame if you cause one, and set the sheet aside. Continue toasting the remaining sheets. Once they cool they should be rather brittle and misshapen.
5. If you don’t have a gas burner, you can toast the nori in a 500°F oven directly on the rack in a single layer for about 4 minutes. The point is that the nori will grow more brittle and aromatic post-toast.
6. Toast the Sesame Seeds: If you can multitask over an open flame, put the sesame oil and seeds in a 12-inch skillet to toast over medium heat while you work the nori. If you are using a smaller skillet, you will need to toast the sesame seeds in batches. The point is for the seeds to pretty much be in a single layer, so with a little tossing and stirring all the seeds meet heat and toast evenly. Once your pan is hot, this will only take about 30 seconds.
7. Some people like to do this in the oven. If this is the route you want to go, preheat your oven to 375°F, spread the seeds out evenly on a baking sheet, and set your timer for 10 minutes. (I choose the stovetop because I hate heating my oven for such a small task and I like to keep my eye on the seeds as they toast.)
8. However you want to go about it, toast the sesame seeds and do it well. Once they’re done take them out of the skillet or off the tray. Otherwise the residual heat will continue to brown the seeds you’ve worked so hard to perfectly toast.
9. Pull the Quirky Furki Together: Now it’s time for the food processor. Basically you are going to process the shrimp, nori, and potato chips separately. Don’t worry about cleaning the food processor in between ingredients. They will all end up together, and their union starts here.
10. Begin with the shrimp. They will take about 10 seconds with your processor on full tilt and what was 2 cups of fluffy fried crustaceans will emerge as 1 cup of shrimp crumbs. Dump that into a large bowl and move on to the nori.
11. Cram all the nori sheets in the food processor. Fasten the lid and let her rip. Toasted nori is more stubborn than dried fried shrimp so this will take a bit longer and will require some pulsing to get all the sheets chopped somewhat evenly. What you’re looking for is about 1½ cups finely chopped pieces, none of which should be bigger than a petite hand’s pinkie nail. Dump the chopped nori into the same bowl with the shrimp crumbs.
12. Now for the potato chips. Put the salt-and-vinegar chips in your food processor and blend for about 5 seconds, or until what you have is potato chip crumbs. Not potato chip dust… potato chip crumbs.
13. Now you have a decision to make. You can add the potato chips to the bowl with the shrimp and the nori, then stir in the sesame seeds, salt, and sugar and call it done. Or you can put all the ingredients, including the sesame seeds, salt, and sugar, in the food processor and blend together until the mixture is a uniform crumb.
14. Both versions have their appeal. The stirred, less-uniform one allows you to visually appreciate the elements that make up the fun ingredient you’ve made. It also provides more crunch to the Quirk. Because of this I generally prefer this version as a topping. The further processed Furki is more uniform and married in a way that delivers a cohesive flavor profile. It’s easier to measure and works better as an ingredient rather than a topping (except on popcorn!). If you want to be ready for whatever opportunity presents itself, blend half and leave half as is.